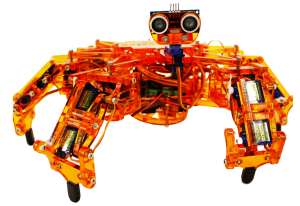
Arcbotics’ Hexapod robot is a low-cost open-source hexapod robot that is 1/10 to 1/20x the cost of most Hexapod robots, which is a great platform for beginners to start experimenting with. But this comes with a price. The carbon gears of its servos are easily broken and it uses bluetooth 2.1 which I found out to be a little bit too spotty and unreliable in my experience ( then again it might just be my Mac 😦 ). Also, in the original Hexapod, the joints are controlled by an Arduino board which uses the same micro-controller as an Arduino Leonardo, an AtMega 32u4. Arcbotics provided a python program which does all the processing on your computer and just sends signals to the robot on how to move the servos via bluetooth.
In my modification, I transferred all the processing in the Hexapod instead. I used the Raspberry Pi Zero as the on-board computer. I no longer need to install software in any computer to control the hexapod, and instead I just use ssh via wifi in order to run any program on board. In order to drive the servos I used two Adafruit 12-bit 16 channel servo drivers with PCA9685 i2c interface which communicates with the Raspberry Pi via the I2C protocol.
Then there’s the code! One of my biggest modifications is that I rewrote the all the Hexapod code from the ground-up . I did this because of a number of reasons. The main reason is that I found it the existing code a little bit hard to read and thus hard to extend, reuse or modify. Also there were some design choices and naming conventions that I didn’t prefer. (Maybe I’ll talk about it in a different article, but not now). Also, I wanted to get better at writing clean, readable code, writing an API for a hexapod robot seems to be a nice exercise. It will also strengthen my understanding of Hexapod gaits and inverse kinematics. If ever I were to design my own Hexapod robot in the future, I can use this as a starting point.
I am by no means a veteran in writing clean readable code and there are always some things you won’t agree with or could be done better that I didn’t realize at the time for writing but that’s what’s great about version control! I can always modify it little by little to make the code better as I gain more experience. 🙂
-
read about theoretical academic stuff about Hexapod robots
-
gather your parts
-
build your robot
-
set up your raspberry pi and other electronic thingies
-
load and modify my code
Read Robot Stuff
I’ve read a bunch of stuff prior to modifying Hexy both academic research and from DIY-yers. I wrote some articles to synthesize what I’ve learned as well. Here are some of the references I found the most useful.
How to Calculate the Inverse Kinematics of Hexy by Michal
Stubby Hexapod Design And Theory
My own articles:
- How Awesome are Hexapod Robots?
- Oh The Things We Do… For Hexapod Robots
- Hexapod Leg Kinematics
- The Many Cases of Stability
- Common Walking Gaits For Hexapods
Alexadre, P., Ghuys, D. and Pruemont, A. 1991. ‘Gait analysis and implementation of a six leg walking machine’. Fifth International Conference on Advanced Robotics: Robots in Unstructured Environments. 19–22 June 1991, vol. 2. pp 941–945
Basic Walking Simulations and Gravitational Stability Analysis for a Hexapod Robot using Matlab S Mănoiu-Olaru, M Niţulescu
Stability Analysis of Hexagonal Hexapod Robot for the Periodic Gaits Dr. Firas A. Raheem, Hind Z. Khaleel
Analysis of Multi-Legged Animal + Robot Gaits
A Comparison of Three Insect Inspired Locomotion Controllers
Insects and Robots
Gather your parts
The Frame
- The frame I used is an open-source frame my Arcbotics. It can be cut with a lazer cutter from a 5mm thick acrylic or can be printed using a 3-d printer. The stl and dxf files are available on Arcbotics’ github
- A bunch of M3 nuts and screws
- mounting stand-offs like the stuff here
- a small philips screw driver
The Servos
- 19 (Nineteen!) 9 gram metal gear micro-servos in an sg90 body.
( I recommend DFRobot’s micro servo or Turnigy TGY-50090M from Hobby King as they fit really nicely 🙂 )
Power Supplies
- 5 volts, and at least 5 amps regulated power supply for powering the servo (dc jack output)
- 5 volts, 2.5 amps (but 1 amp might be sufficient) for powering the Raspberry Pi, Wifi Module and Servo drivers (micro usb output)
Servo Driver and Peripherals
- I used two Adafruit 12-bit 16-channel servo so that I can simply send commands via i2c
- Capacitors, one 2.2 uF, one 1.1 uF
- Male/Male jumpers, Male to Female Jumpers, Male Pin Headers, Terminal Blocks, Soldering Iron, Solder…
- Female DC Power adapter – 2.1mm jack to screw terminal block
Raspberry Pi and Peripherals
- Raspberry Pi Zero
- USB Wifi Dongle
- Micro USB to USB cable, Mini HDMI to HDMI cable
- 8 GB micro SD card and SD card adapter
- USB expander (to 4 port USB)
- USB Keyboard, USB Mouse, and HDMI monitor
(most peripherals is included in this Adafruit budget starter pack)
Build Your Robot
Check out the instructions on the Arcbotics website. Ignore the part about the micro-controller
Set-up Stuff
Introduction to I2c protocol by Sparkfun
Introduction to Adafruit Servo Drivers, Chaining them, and calibrating them
Using Adafruit Servo Driver with your Pi
Load The Code
My code can be found on github. Let me know what you think!! You can compare with the original Arcbotics code if you like.

Hexapod robot is quite expensive than a following line robot. Is this your first robot?
LikeLike
No. My first robot is Pololu 3pi – https://www.pololu.com/product/975
LikeLike
We shared a common interest, I want to make friend with you.
You’re welcome to add me in wechat.
My ID: Juztice (decoy ID)
LikeLike